mirror of
https://github.com/zhigang1992/react-native-firebase.git
synced 2026-04-12 22:39:15 +08:00
252 lines
9.6 KiB
Markdown
252 lines
9.6 KiB
Markdown
---
|
|
title: React Native Firebase
|
|
description: Welcome to React Native Firebase! To get started, you must first setup a Firebase project and install the "app" module.
|
|
next: /typescript
|
|
---
|
|
|
|
React Native Firebase is the officially recommended collection of packages that brings React Native support for all Firebase services on both Android and iOS apps.
|
|
|
|
## Prerequisites
|
|
|
|
Before getting started, the documentation assumes you are able to create a project with React Native and that you have an active Firebase project.
|
|
If you do not meet these prerequisites, follow the links below:
|
|
|
|
- [Getting started with React Native](https://facebook.github.io/react-native/docs/getting-started.html)
|
|
- [Create a new Firebase project](https://console.firebase.google.com/)
|
|
|
|
## Installation
|
|
|
|
Installing React Native Firebase requires a few steps; installing the NPM module, adding the Firebase config files &
|
|
rebuilding your application.
|
|
|
|
### 1. Install via NPM
|
|
|
|
Install the React Native Firebase "app" module to the root of your React Native project with NPM or Yarn:
|
|
|
|
```bash
|
|
# Using npm
|
|
npm install --save @react-native-firebase/app
|
|
|
|
# Using Yarn
|
|
yarn add @react-native-firebase/app
|
|
```
|
|
|
|
The `@react-native-firebase/app` module must be installed before using any other Firebase service.
|
|
|
|
### 2. Android Setup
|
|
|
|
To allow the Android app to securely connect to your Firebase project, a configuration file must be downloaded and added
|
|
to your project.
|
|
|
|
#### Generating Android credentials
|
|
|
|
On the Firebase console, add a new Android application and enter your projects details. The "Android package name" must match your
|
|
local projects package name which can be found inside of the `manifest` tag within the `/android/app/src/main/AndroidManifest.xml`
|
|
file within your project.
|
|
|
|
> The debug signing certificate is optional to use Firebase with your app, but is required for Dynamic Links, Invites and Phone Authentication.
|
|
> To generate a certificate run `cd android && ./gradlew signingReport` and copy the SHA1 from the `debug` key. This generates two variant keys.
|
|
> You can copy the 'SHA1' that belongs to the `debugAndroidTest` variant key option.
|
|
|
|
Download the `google-services.json` file and place it inside of your project at the following location: `/android/app/google-services.json`.
|
|
|
|
#### Configure Firebase with Android credentials
|
|
|
|
To allow Firebase on Android to use the credentials, the `google-services` plugin must be enabled on the project. This requires modification to two
|
|
files in the Android directory.
|
|
|
|
First, add the `google-services` plugin as a dependency inside of your `/android/build.gradle` file:
|
|
|
|
```groovy
|
|
buildscript {
|
|
dependencies {
|
|
// ... other dependencies
|
|
classpath 'com.google.gms:google-services:4.2.0'
|
|
// Add me --- /\
|
|
}
|
|
}
|
|
```
|
|
|
|
Lastly, execute the plugin by adding the following to the **very bottom** of your `/android/app/build.gradle` file:
|
|
|
|
```groovy
|
|
apply plugin: 'com.google.gms.google-services'
|
|
```
|
|
|
|
### 3. iOS Setup
|
|
|
|
To allow the iOS app to securely connect to your Firebase project, a configuration file must be downloaded and added to your project.
|
|
|
|
#### Generating iOS credentials
|
|
|
|
On the Firebase console, add a new iOS application and enter your projects details. The "iOS bundle ID" must match your
|
|
local project bundle ID. The bundle ID can be found within the "General" tab when opening the project with Xcode.
|
|
|
|
Download the `GoogleService-Info.plist` file.
|
|
|
|
Using Xcode, open the projects `/ios/{projectName}.xcodeproj` file (or `/ios/{projectName}.xcworkspace` if using Pods).
|
|
|
|
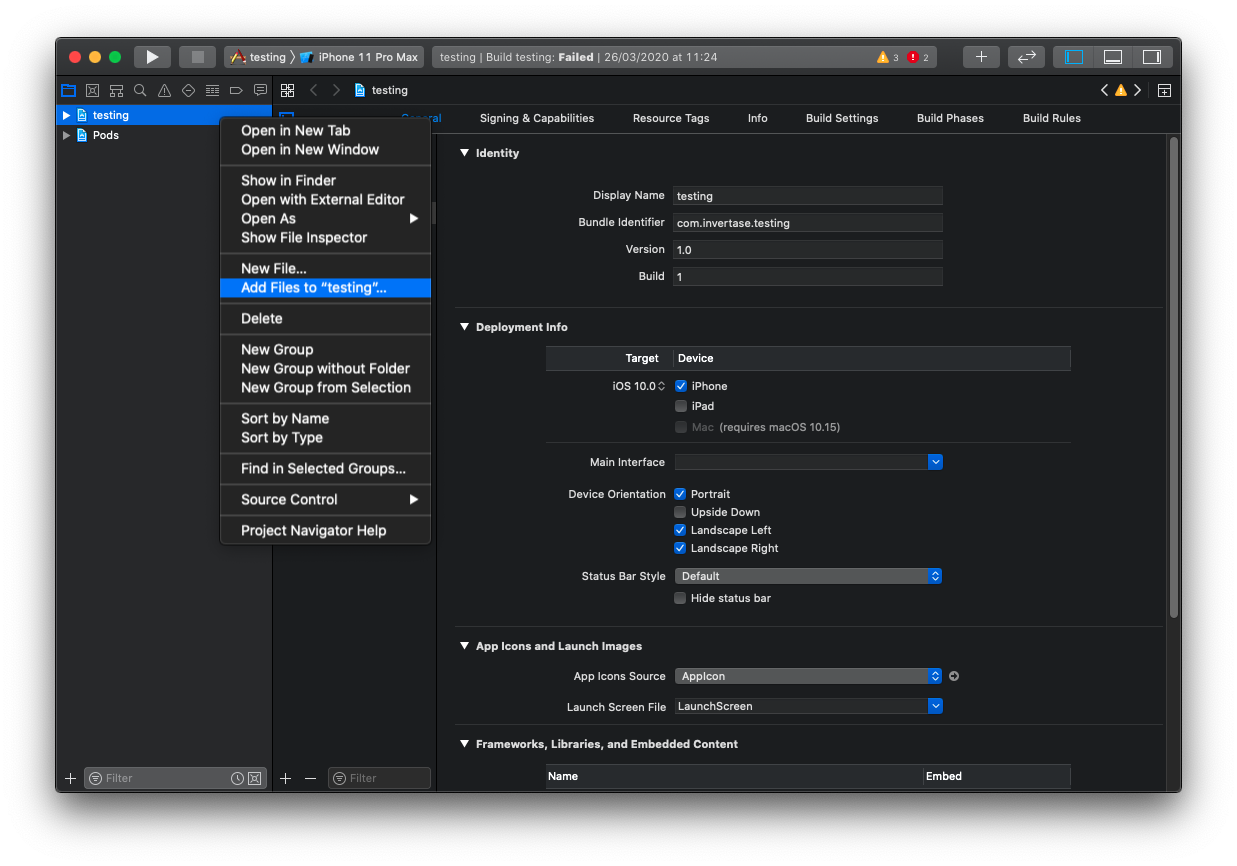
Right click on the project name and "Add files" to the project, as demonstrated below:
|
|
|
|
|
|
|
|
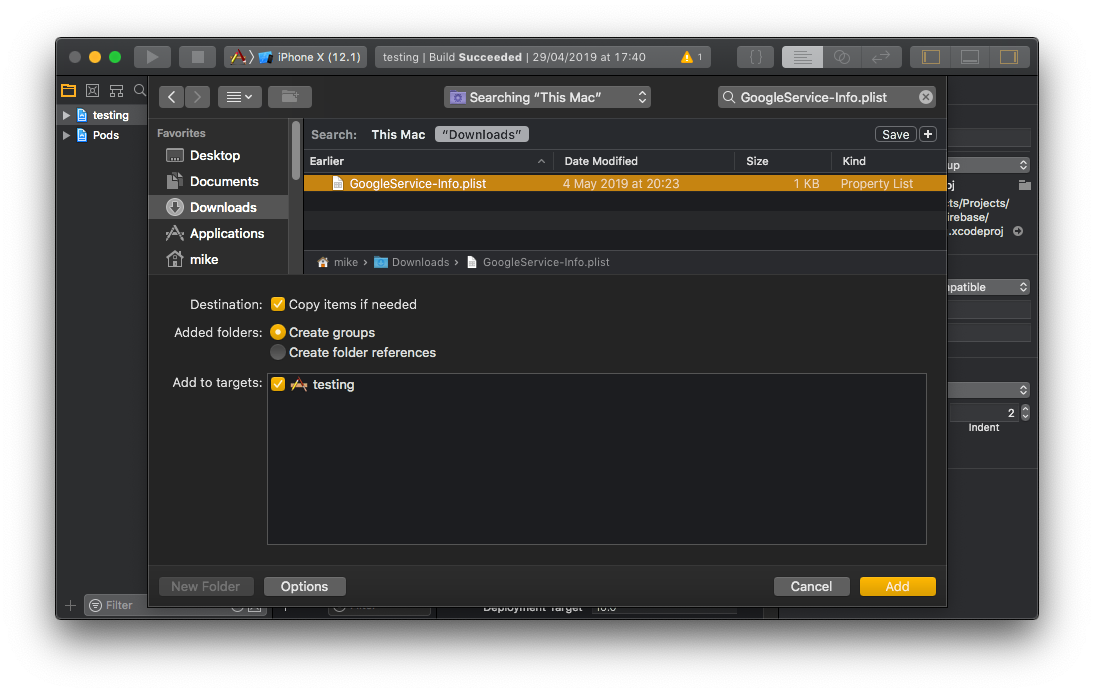
Select the downloaded `GoogleService-Info.plist` file from your computer, and ensure the "Copy items if needed" checkbox is enabled.
|
|
|
|
|
|
|
|
#### Configure Firebase with iOS credentials
|
|
|
|
To allow Firebase on iOS to use the credentials, the Firebase iOS SDK must be configured during the bootstrap phase of your application.
|
|
|
|
To do this, open your `/ios/{projectName}/AppDelegate.m` file, and add the following:
|
|
|
|
At the top of the file, import the Firebase SDK:
|
|
|
|
```
|
|
#import <Firebase.h>
|
|
```
|
|
|
|
Within your existing `didFinishLaunchingWithOptions` method, add the following to the top of the method:
|
|
|
|
```
|
|
- (BOOL)application:(UIApplication *)application didFinishLaunchingWithOptions:(NSDictionary *)launchOptions {
|
|
// Add me --- \/
|
|
if ([FIRApp defaultApp] == nil) {
|
|
[FIRApp configure];
|
|
}
|
|
// Add me --- /\
|
|
// ...
|
|
}
|
|
```
|
|
|
|
### 4. Autolinking & rebuilding
|
|
|
|
Once the above steps have been completed, the React Native Firebase library must be linked to your project and your application needs to be rebuilt.
|
|
|
|
Users on React Native 0.60+ automatically have access to "[autolinking](https://github.com/react-native-community/cli/blob/master/docs/autolinking.md)",
|
|
requiring no further manual installation steps. To automatically link the package, rebuild your project:
|
|
|
|
```bash
|
|
# Android apps
|
|
npx react-native run-android
|
|
|
|
# iOS apps
|
|
cd ios/
|
|
pod install --repo-update
|
|
npx react-native run-ios
|
|
```
|
|
|
|
Once successfully linked and rebuilt, your application will be connected to Firebase using the `@react-native-firebase/app` module. This module does not provide much functionality, therefore to use other Firebase services; each of the modules for the individual Firebase services need installing separately.
|
|
|
|
#### Manual Linking
|
|
|
|
If you're using an older version of React Native without autolinking support, or wish to integrate into an existing project,
|
|
you can follow the manual installation steps for [iOS](/install-ios) and [Android](/install-android).
|
|
|
|
---
|
|
|
|
## Miscellaneous
|
|
|
|
### Android Enabling Multidex
|
|
|
|
As your application starts to grow with more native dependencies, your builds may start to fail with the common
|
|
`Execution failed for task ':app:mergeDexDebug'` error. This error occurs when Android reaches the
|
|
[64k methods](https://developer.android.com/studio/build/multidex) limit.
|
|
|
|
One common solution is to [enable multidex](/enabling-multidex) support for Android. This is a common solution to solving
|
|
the problem, however it is recommended you read the Android documentation to understand how it may impact your application.
|
|
|
|
### Hermes Support
|
|
|
|
At this time, React Native Firebase does not support the [Hermes](https://hermesengine.dev/) JavaScript engine due to
|
|
compatibility issues. We are actively tracking the changes to Hermes and will ensure support once both are compatible
|
|
with each other.
|
|
|
|
### Overriding Native SDK Versions
|
|
|
|
React Native Firebase internally sets the versions of the native SDKs which each module uses. Each release of the library
|
|
is tested against a fixed set of SDK versions (e.g. Firebase SDKs), allowing us to be confident that every feature the
|
|
library supports is working as expected.
|
|
|
|
Sometimes it's required to change these versions to play nicely with other React Native libraries; therefore we allow
|
|
manually overriding these native SDK versions.
|
|
|
|
> Using your own SDK versions is generally not recommended as it can lead to breaking changes in your application. Proceed with caution.
|
|
|
|
#### Android
|
|
|
|
Within your projects /android/app/build.gradle file, provide your own versions by specifying any of the following options shown below:
|
|
|
|
```groovy
|
|
project.ext {
|
|
set('react-native', [
|
|
versions: [
|
|
// Overriding Build/Android SDK Versions
|
|
android : [
|
|
minSdk : 16,
|
|
targetSdk : 28,
|
|
compileSdk: 28,
|
|
buildTools: "28.0.3"
|
|
],
|
|
|
|
// Overriding Library SDK Versions
|
|
firebase: [
|
|
// Override Firebase SDK Version
|
|
bom : "21.1.0",
|
|
|
|
// Override Crashlytics SDK Version
|
|
crashlytics : "2.10.0",
|
|
|
|
// Override Crashlytics SDK Version
|
|
crashlyticsNdk: "2.1.0"
|
|
],
|
|
],
|
|
])
|
|
}
|
|
```
|
|
|
|
Once changed, rebuild your application with `npx react-native run-android`.
|
|
|
|
#### iOS
|
|
|
|
Open your projects `/ios/Podfile` and add any of the globals shown below to the top of the file:
|
|
|
|
```ruby
|
|
# Override Firebase SDK Version
|
|
$FirebaseSDKVersion = '6.13.0'
|
|
|
|
# Override Fabric SDK Version
|
|
$FabricSDKVersion = '1.6.0'
|
|
|
|
# Override Crashlytics SDK Version
|
|
$CrashlyticsSDKVersion = '3.1.0'
|
|
```
|
|
|
|
Once changed, reinstall your projects pods via pod install and rebuild your project with `npx react-native run-ios`.
|
|
|
|
### Increasing Android build memory
|
|
|
|
As you add more Firebase modules, there is an incredible demand placed on the Android build system, and the default memory
|
|
settings will not work. To avoid `OutOfMemory` errors during Android builds, you should uncomment the alternate Gradle memory
|
|
setting present in `/android/gradle.properties`:
|
|
|
|
```
|
|
# Specifies the JVM arguments used for the daemon process.
|
|
# The setting is particularly useful for tweaking memory settings.
|
|
# Default value: -Xmx10248m -XX:MaxPermSize=256m
|
|
org.gradle.jvmargs=-Xmx2048m -XX:MaxPermSize=512m -XX:+HeapDumpOnOutOfMemoryError -Dfile.encoding=UTF-8
|
|
```
|
|
|
|
### Allow iOS Static Frameworks
|
|
|
|
If you are using Static Frameworks on iOS, you need to manually enable this for the project. To enable Static Framework
|
|
support, add the following global to the top of your `/ios/Podfile` file:
|
|
|
|
```ruby
|
|
$RNFirebaseAsStaticFramework = true
|
|
```
|
|
|
|
### Expo
|
|
|
|
Expo does not support integration with native modules via it's ["Managed workflow"](https://docs.expo.io/versions/latest/introduction/managed-vs-bare/#managed-workflow). Integration is only possible when used with the ["Bare workflow"](https://docs.expo.io/versions/latest/introduction/managed-vs-bare/#bare-workflow).
|