mirror of
https://github.com/zhigang1992/react-native-firebase.git
synced 2026-04-07 09:27:42 +08:00
156 lines
8.0 KiB
Markdown
156 lines
8.0 KiB
Markdown
---
|
|
title: iOS Messaging Setup
|
|
description: iOS requires additional configuration steps to be completed before you can receive messages.
|
|
---
|
|
|
|
Integrating the Cloud Messaging module on iOS devices requires additional setup before you devices receive messages.
|
|
There are also a number of prerequisites which are required to be able to enable messaging:
|
|
|
|
- You must have an active [Apple Developer Account](https://developer.apple.com/membercenter/index.action).
|
|
- You must have a physical iOS device to receive messages.
|
|
- Firebase Cloud Messaging integrates with the [Apple Push Notification service (APNs)](https://developer.apple.com/notifications/),
|
|
however APNs only works with real devices.
|
|
|
|
## Configuring your app
|
|
|
|
Before your application can start to receive messages, you must explicitly enable "Push Notifications" and "Background Modes"
|
|
within Xcode.
|
|
|
|
Open your project's workspace file via Xcode (found within the `/ios` directory). The file name is prefixed with your project name,
|
|
for example `/ios/myapp.xcworkspace`. Once open, follow the steps below:
|
|
|
|
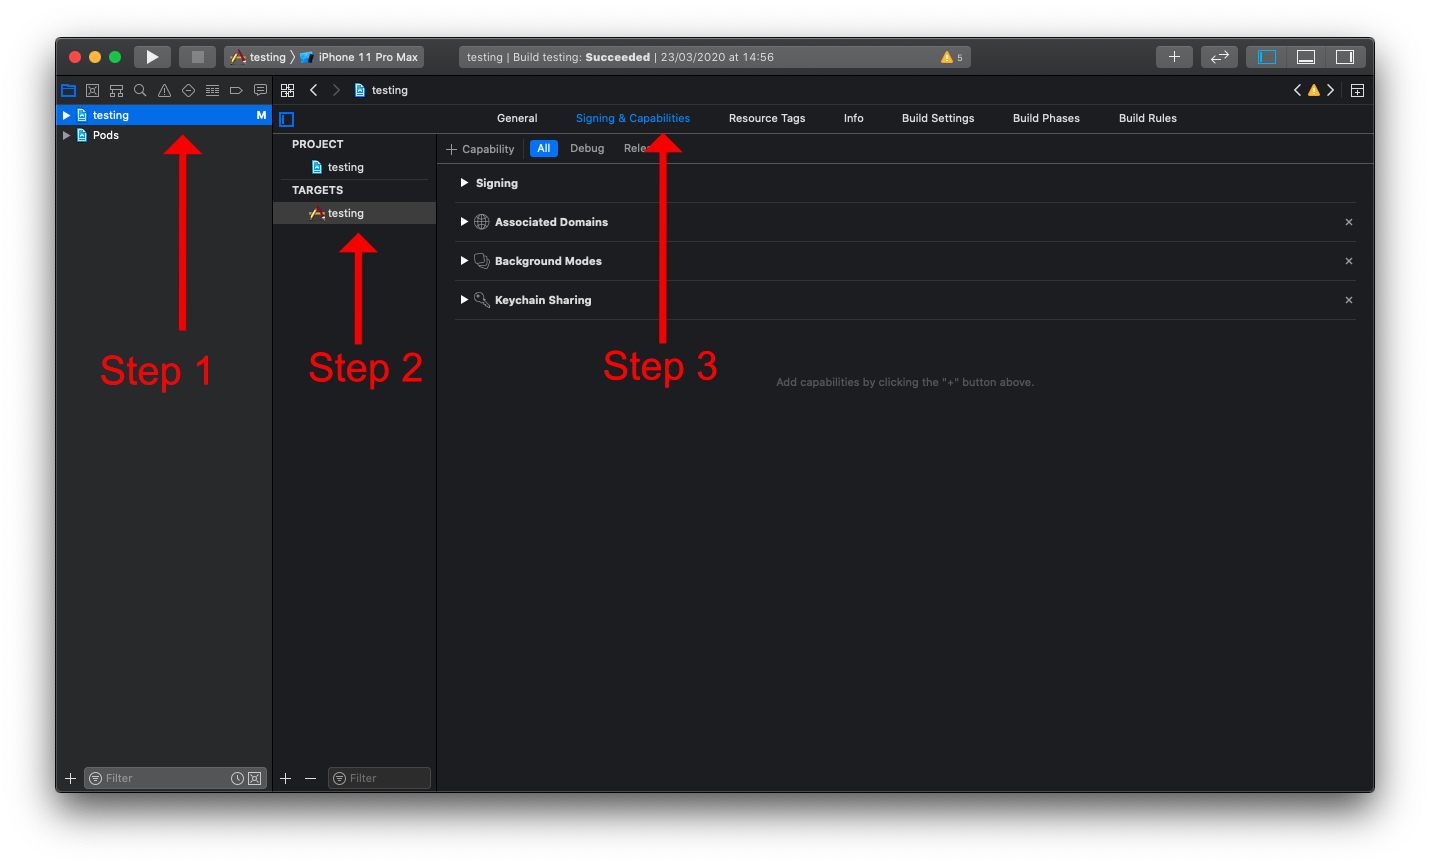
1. Select your project.
|
|
2. Select the project target.
|
|
3. Select the "Signing & Capabilities" tab.
|
|
|
|
|
|
|
|
### Enable Push Notifications
|
|
|
|
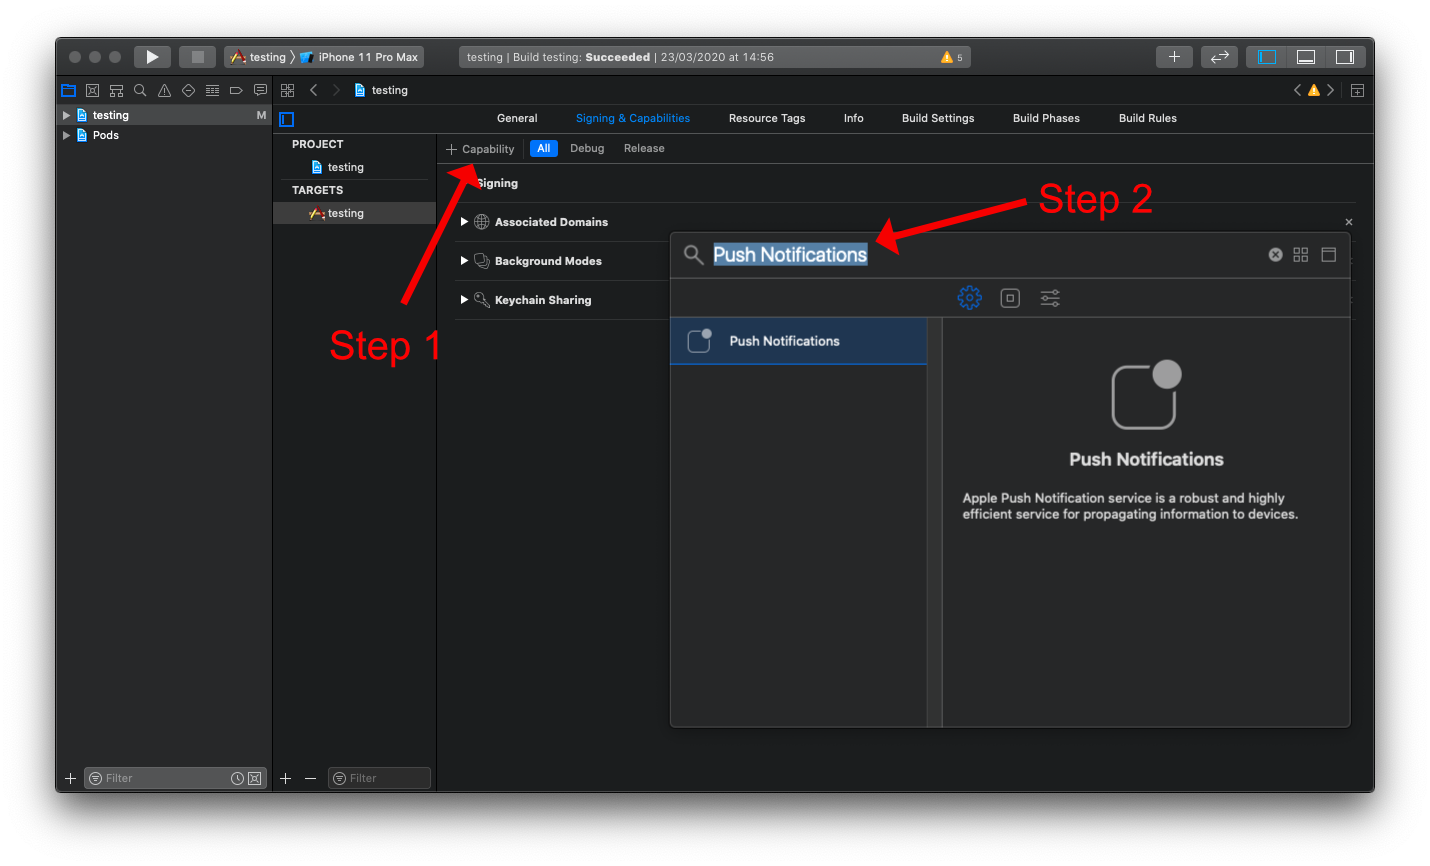
Next the "Push Notifications" capability needs to be added to the project. This can be done via the "Capability" option on the
|
|
"Signing & Capabilities" tab:
|
|
|
|
1. Click on the "+ Capabilities" button.
|
|
2. Search for "Push Notifications".
|
|
|
|
|
|
|
|
Once selected, the capability will be shown below the other enabled capabilities. If no option appears when searching, the
|
|
capability may already be enabled.
|
|
|
|
### Enable Background Modes
|
|
|
|
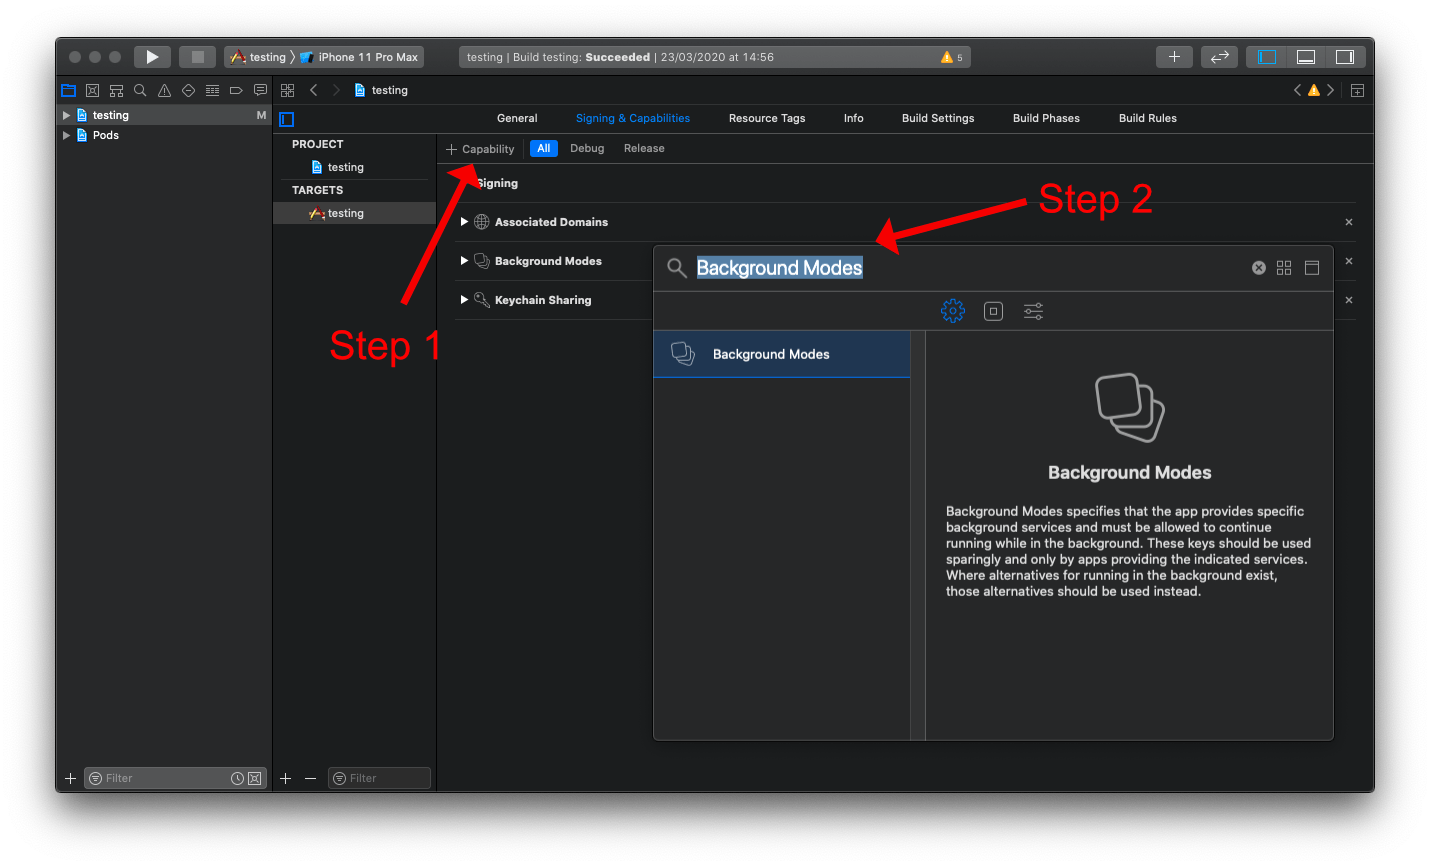
Next the "Background Modes" capability needs to be enabled, along with both the "Background fetch" and "Remote notifications" sub-modes.
|
|
This can be added via the "Capability" option on the "Signing & Capabilities" tab:
|
|
|
|
1. Click on the "+ Capabilities" button.
|
|
2. Search for "Background Modes".
|
|
|
|
|
|
|
|
Once selected, the capability will be shown below the other enabled capabilities. If no option appears when searching, the
|
|
capability may already be enabled.
|
|
|
|
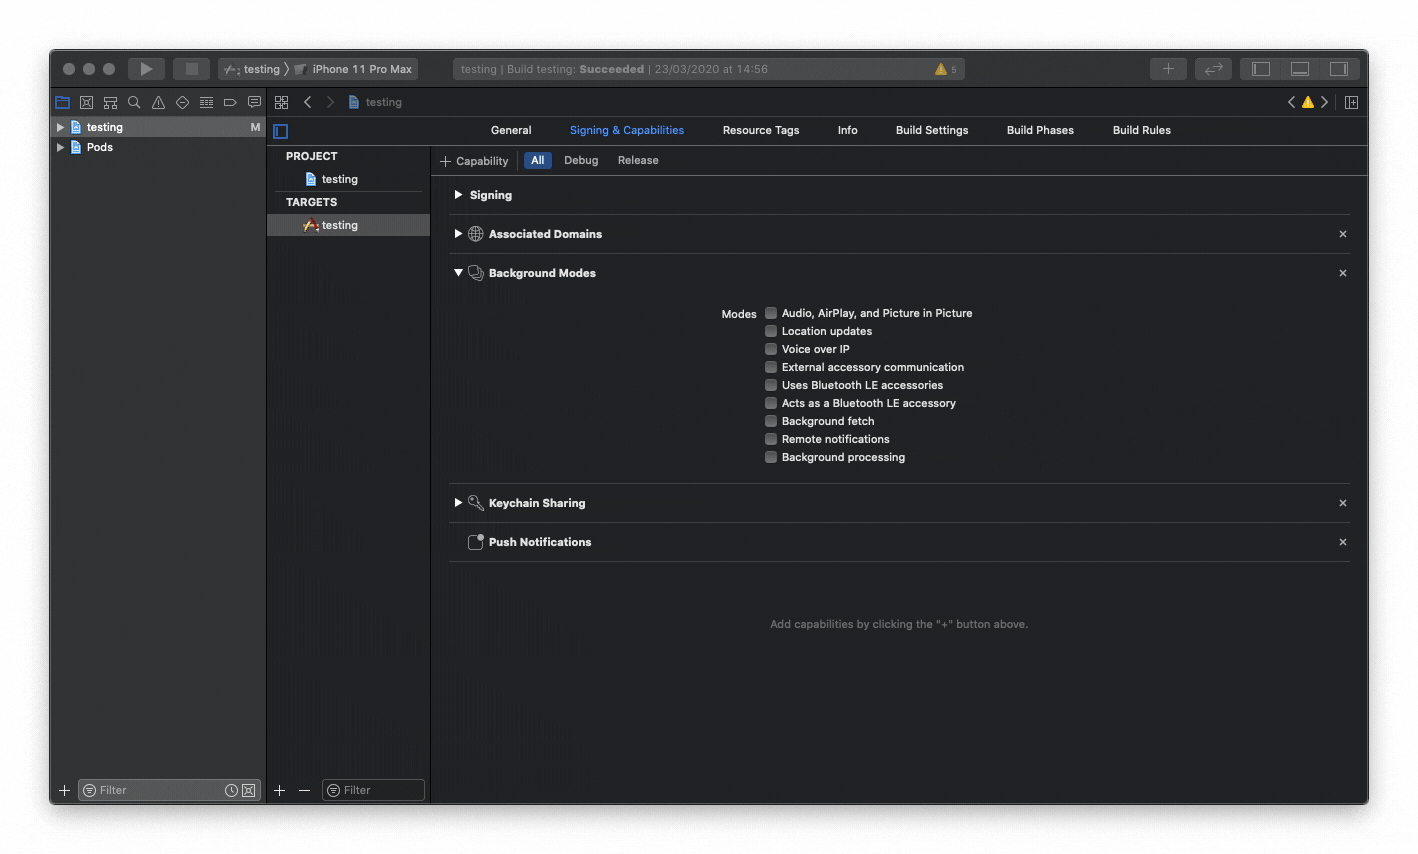
Now ensure that both the "Background fetch" and the "Remote notifications" sub-modes are enabled:
|
|
|
|
|
|
|
|
## Linking APNs with FCM (iOS)
|
|
|
|
> Note: APNs is now required for both `foreground` and `background` messaging to function correctly on iOS.
|
|
|
|
A few steps are required:
|
|
|
|
1. [Registering a key](#1-registering-a-key).
|
|
2. [Registering an App Identifier](#2-registering-an-app-identifier).
|
|
3. [Generating a provisioning profile](#3-generating-a-provisioning-profile).
|
|
|
|
All of these steps require you to have access to your [Apple Developer](https://developer.apple.com/membercenter/index.action) account.
|
|
Once on the account, navigate to the [Certificates, Identifiers & Profiles](https://developer.apple.com/account/resources/certificates/list)
|
|
tab on the account sidebar:
|
|
|
|

|
|
|
|
### 1. Registering a key
|
|
|
|
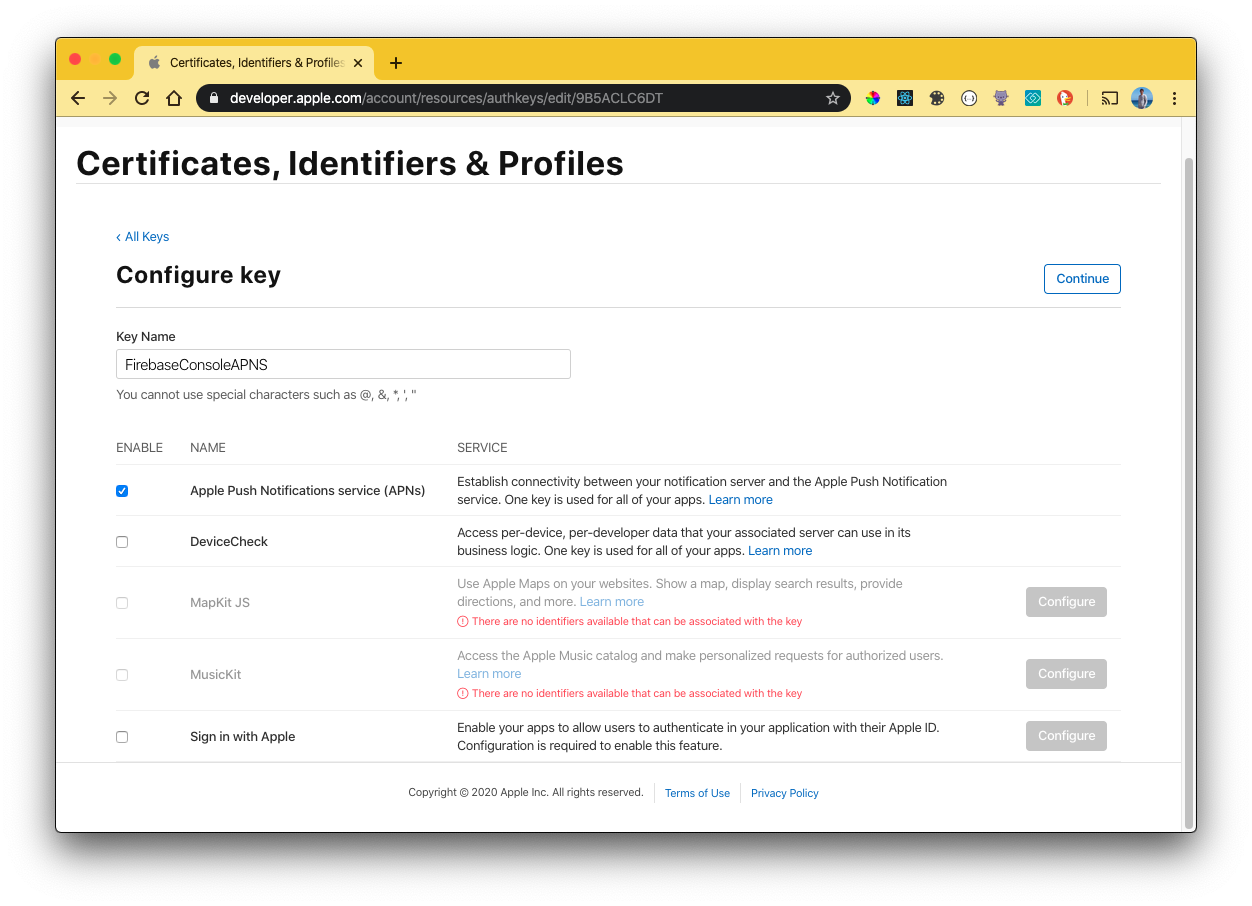
A key can be generated which gives the FCM full access over the Apple Push Notification service (APNs). On the "Keys" menu item,
|
|
register a new key. The name of the key can be anything, however you must ensure the APNs service
|
|
is enabled:
|
|
|
|
|
|
|
|
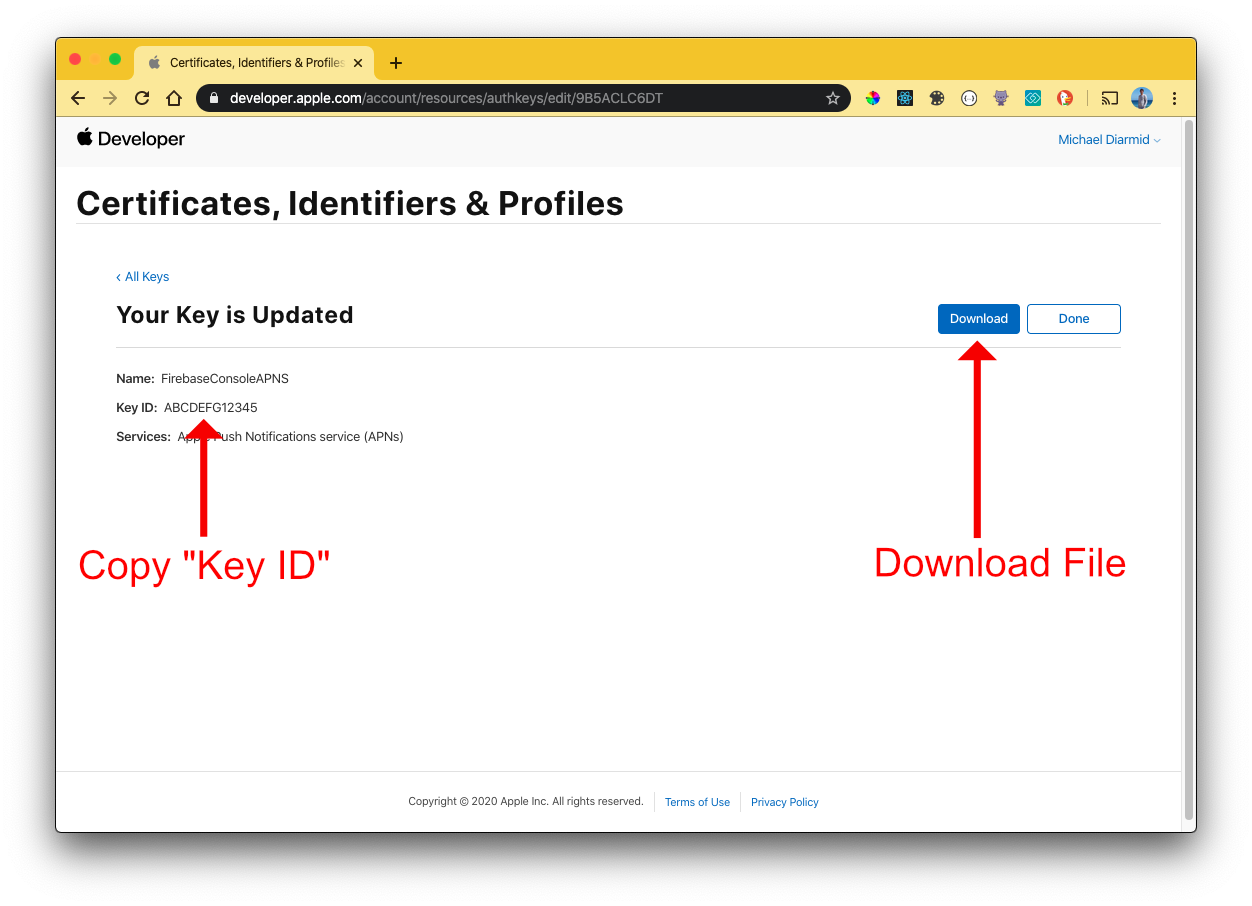
Click "Continue" & then "Save". Once saved, you will be presented with a screen displaying the private "Key ID" & the ability
|
|
to download the key. Copy the ID, and download the file to your local machine:
|
|
|
|
|
|
|
|
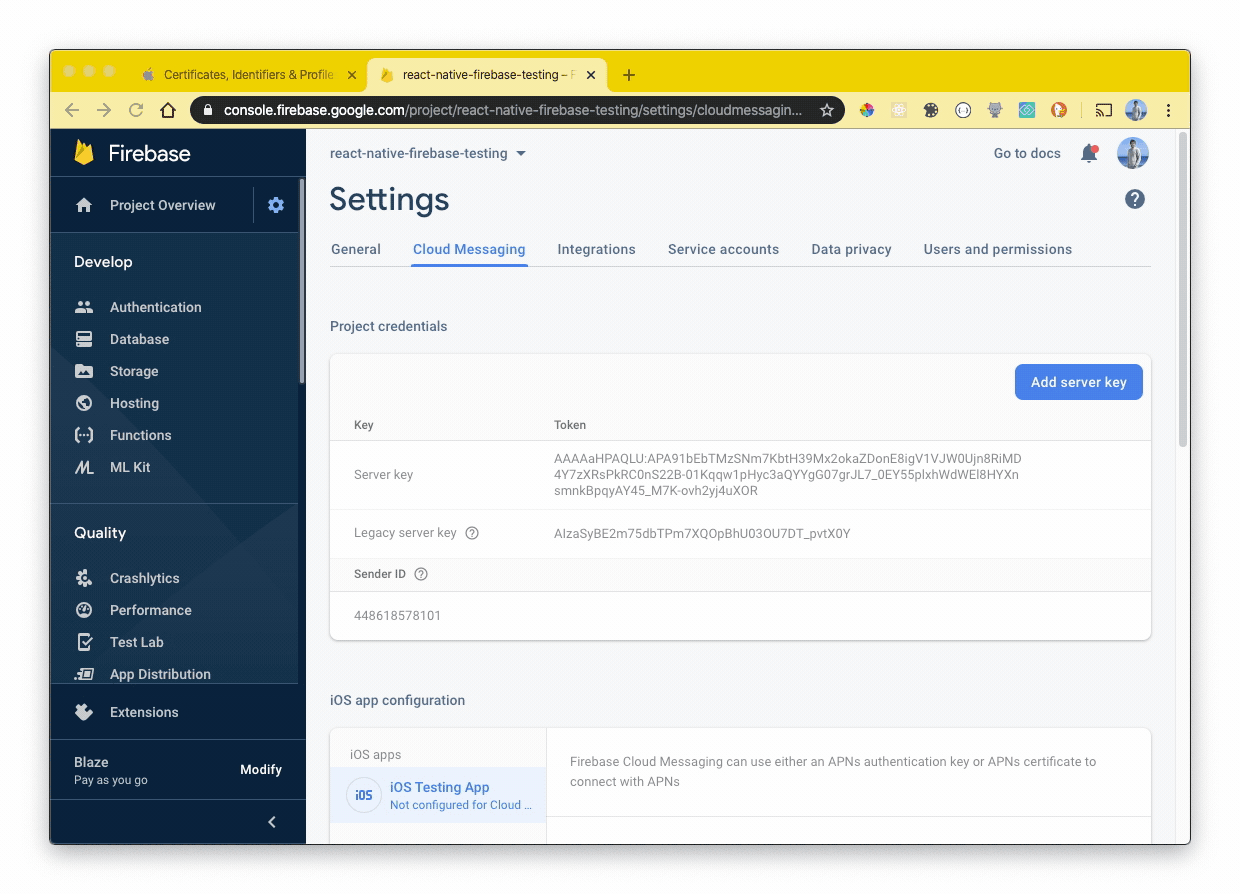
The file & Key ID can now be added to your Firebase Project. On the [Firebase Console](https://console.firebase.google.com/project/_/settings/cloudmessaging),
|
|
navigate to the "Project settings" and select the "Cloud Messaging" tab. Select your iOS application under the "iOS app configuration" heading.
|
|
|
|
Upload the downloaded file and enter the Key ID:
|
|
|
|
|
|
|
|
### 2. Registering an App Identifier
|
|
|
|
For messaging to work when your app is built for production, you must create a new App Identifier which is linked to the
|
|
application that you're developing.
|
|
|
|
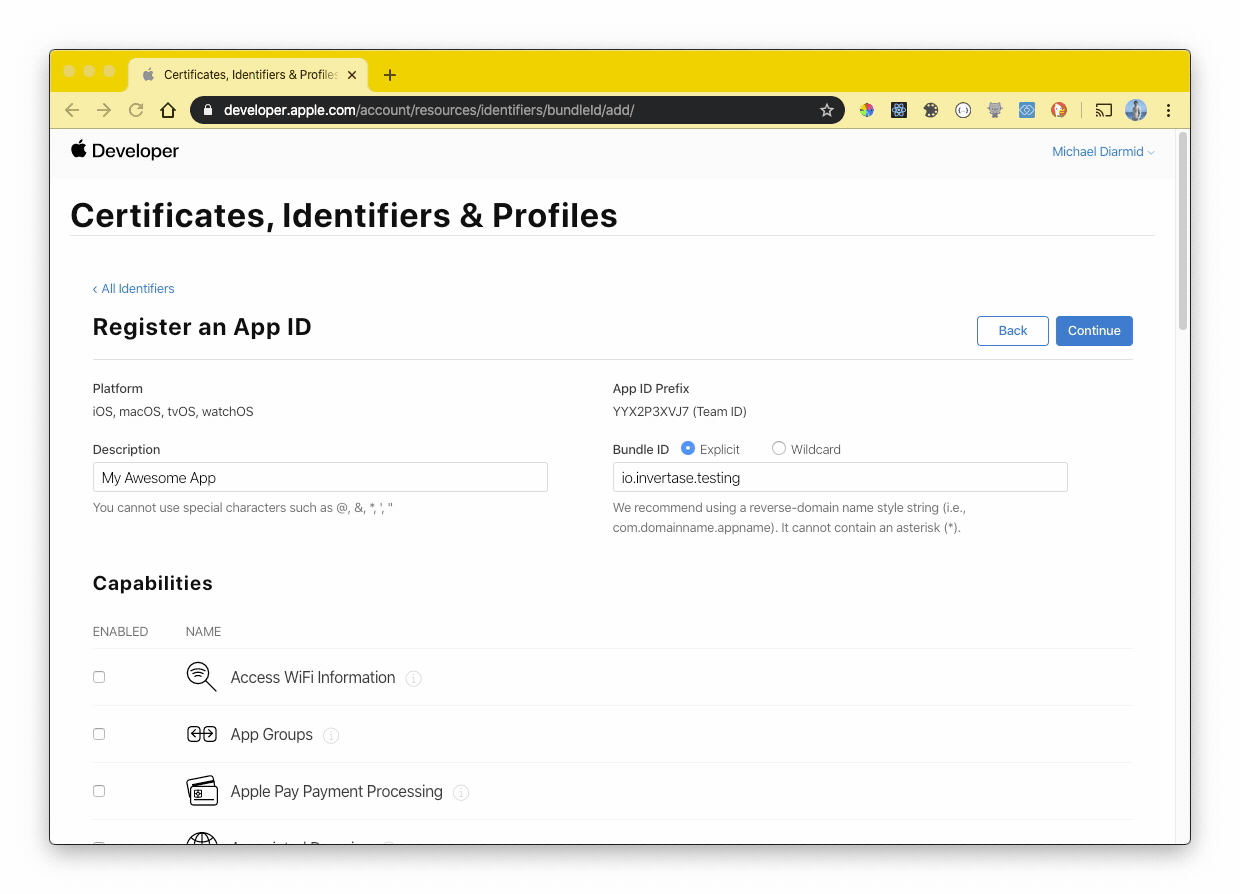
On the "Identifiers" menu item, register a App Identifier. Select the "App IDs" option and click "Continue".
|
|
|
|
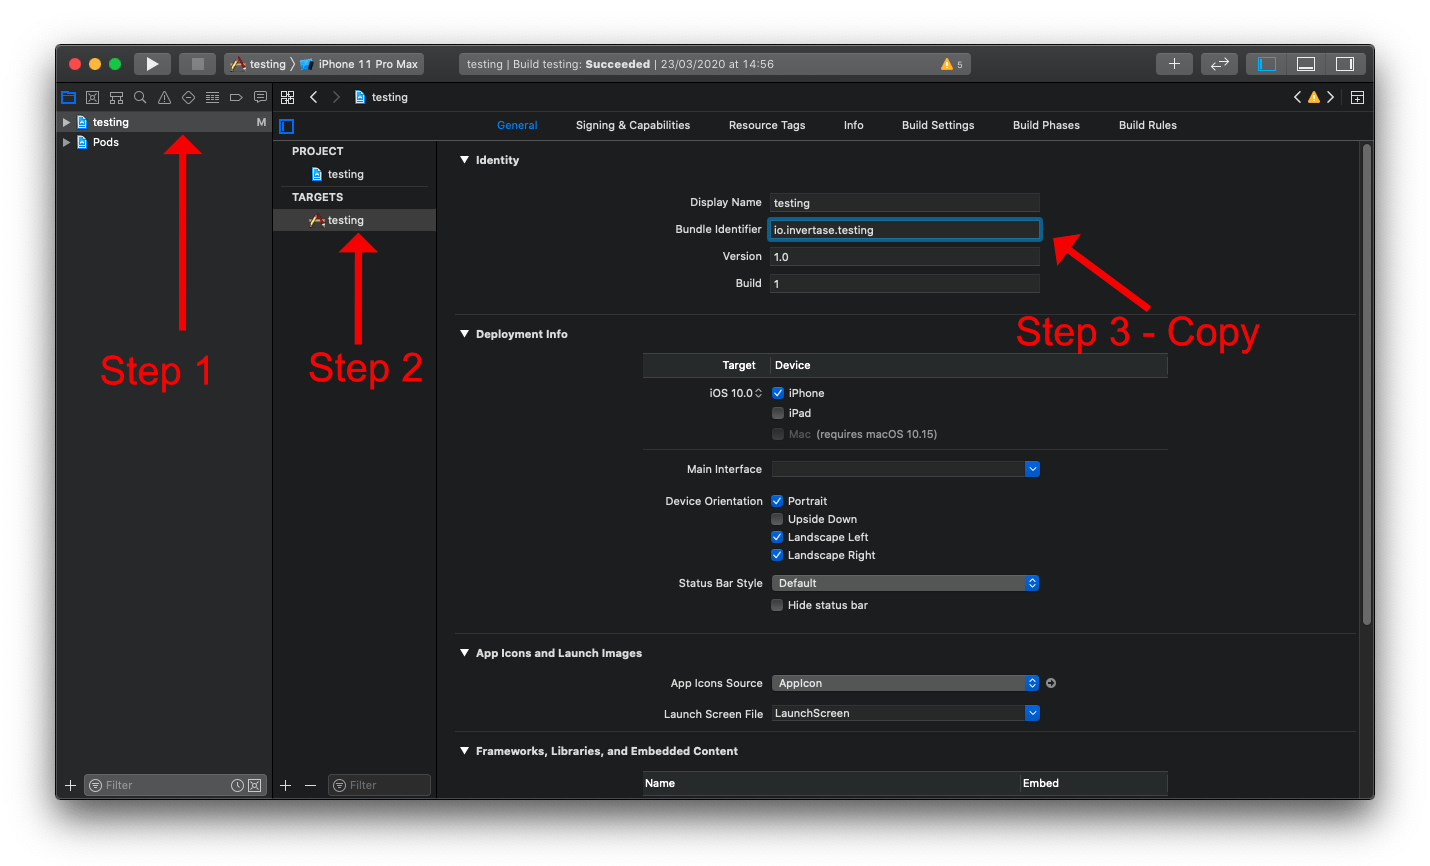
The following screen enables you to link the identifier to your application via the "Bundle ID". This is a unique string
|
|
which was generated when starting your new React Native project. Your Bundle ID can be obtained within Xcode, under the
|
|
"General" tab for your project target:
|
|
|
|
|
|
|
|
Next, follow these steps:
|
|
|
|
1. Enter a description for the identifier.
|
|
2. Enter the "Bundle ID" copied from Xcode.
|
|
3. Scroll down and enable the "Push Notifications" capability (along with any others your app uses).
|
|
|
|
|
|
|
|
Save the identifier, it'll be used when creating a provisioning profile in the next step.
|
|
|
|
### 3. Generating a provisioning profile
|
|
|
|
A provisioning profile enables signed communicate between Apple and your application. Since messaging can only be used on
|
|
real devices, a signed certificate ensures that the app being installed on a device is genuine and has the correct
|
|
permissions enabled.
|
|
|
|
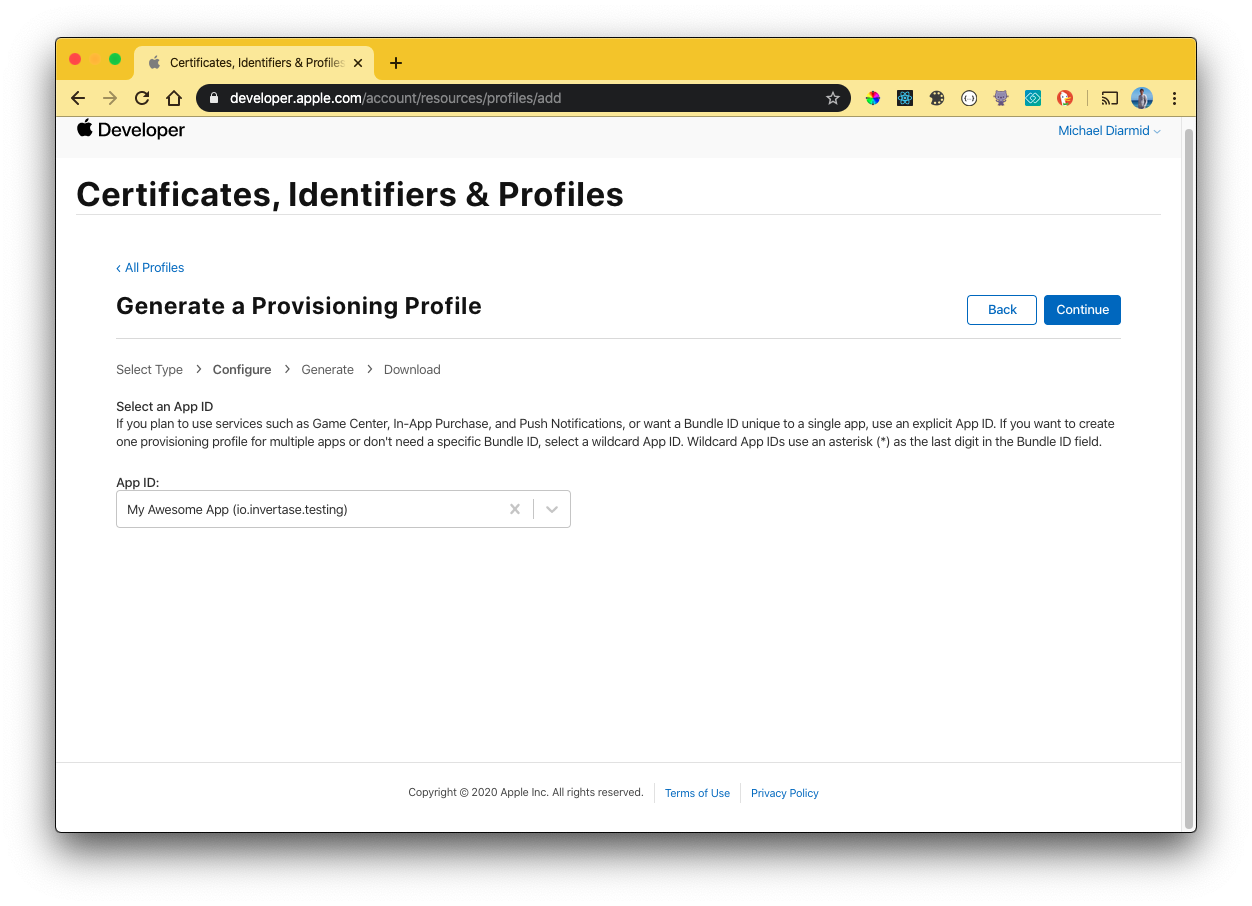
On the "Profiles" menu item, register a new Profile. Select the "iOS App Development" checkbox and click "Continue".
|
|
|
|
If you followed [Step 2](#2-registering-an-app-identifier) correctly, your App Identifier will be available in the drop down
|
|
provided:
|
|
|
|
|
|
|
|
Click "Continue". On the next screen you will be presented with the Certificates on your Apple account. Select the user
|
|
certificates that you wish to assign this provisioning profile too. If you have not yet created a Certificate, you must set
|
|
one up on your account.
|
|
|
|
To create a new Certificate, follow the [Apple documentation](https://help.apple.com/developer-account/#/devbfa00fef7). Once
|
|
the Certificate has been downloaded, upload it to the Apple Developer console via the "Certificates" menu item.
|
|
|
|
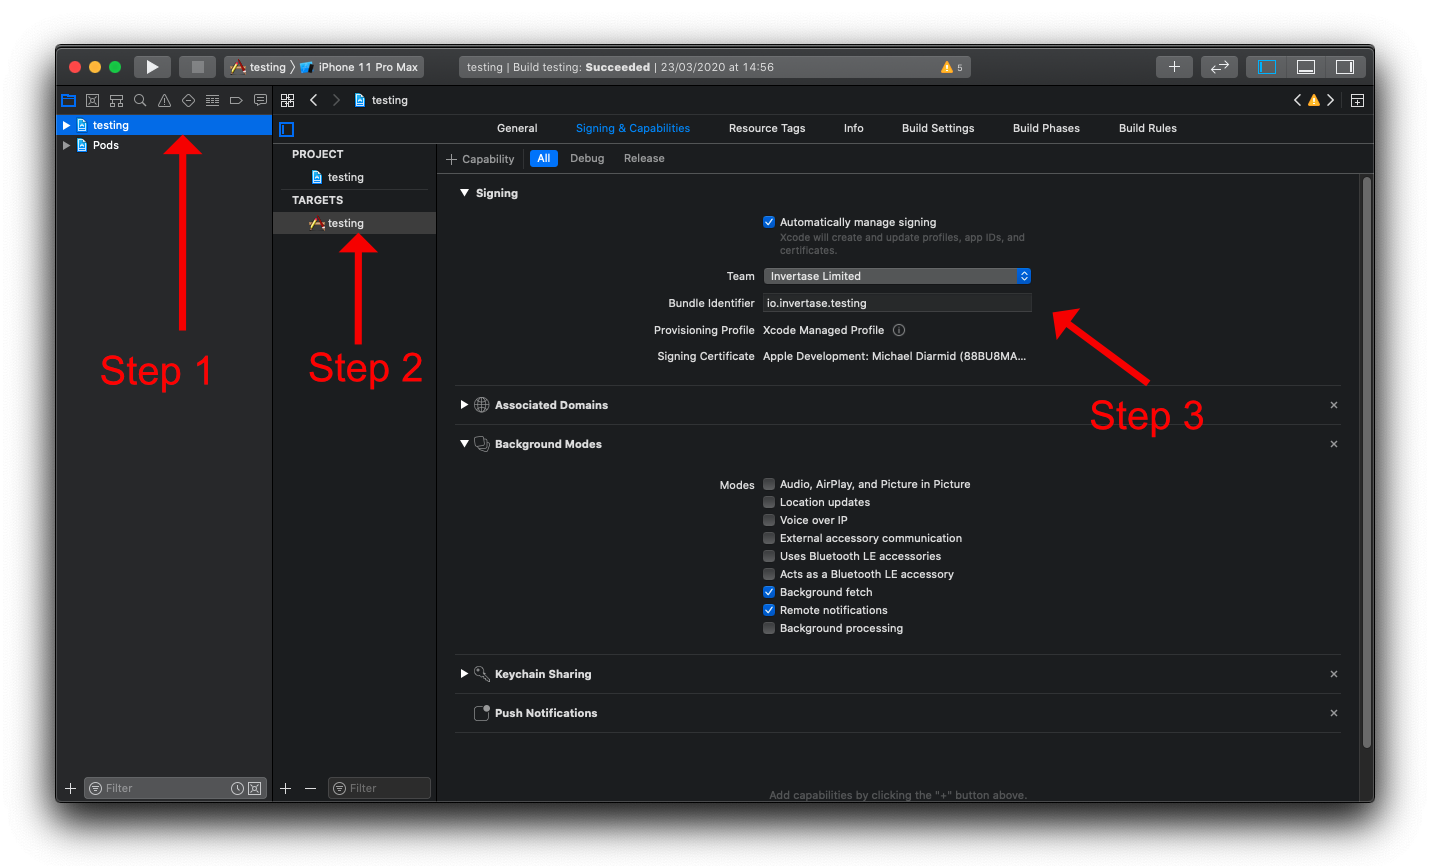
The created provisioning profile can now be used when building your application (in both debug and release mode) onto a
|
|
real device (using Xcode). Back within Xcode, select your project target and select the "Signing & Capabilities" tab.
|
|
If Xcode (via Preferences) is linked to your Apple Account, Xcode can automatically sync the profile created above. Otherwise,
|
|
you must manually add the profile from the Apple Developer console:
|
|
|
|
1. Select the project.
|
|
2. Select the project target.
|
|
3. Assign the provisioning profile.
|
|
|
|
|
|
|
|
## Next steps
|
|
|
|
Once the above has been completed, you're ready to get started receiving messages on your iOS device for both
|
|
testing and production. To rebuild your app, run the following command:
|
|
|
|
```bash
|
|
npx react-native run-ios
|
|
```
|