---
id: advanced-usage
title: Advanced Usage
---
We didn't add any dependencies for working with files and images, since there are a couple of them and you might want to use different ones.
## Images
In this example, we will use [react-native-image-picker](https://github.com/react-native-image-picker/react-native-image-picker), follow the instructions there to install it. After it is done we can use the image picker to select an image and send it as a message (full example with images and files can be found [here](#putting-it-all-together)):
```ts
// ...
import { launchImageLibrary } from 'react-native-image-picker'
const App = () => {
// ...
const handleImageSelection = () => {
launchImageLibrary(
{
includeBase64: true,
maxWidth: 1440,
mediaType: 'photo',
quality: 0.7,
},
({ assets }) => {
const response = assets?.[0]
if (response?.base64) {
const imageMessage: MessageType.Image = {
author: user,
createdAt: Date.now(),
height: response.height,
id: uuidv4(),
name: response.fileName ?? response.uri?.split('/').pop() ?? '🖼',
size: response.fileSize ?? 0,
type: 'image',
uri: `data:image/*;base64,${response.base64}`,
width: response.width,
}
addMessage(imageMessage)
}
}
)
}
return (
)
}
export default App
```
Similar to the text message, you will need to create an image message using data from the image picker. In this example, we use `base64` just for demo purposes, but for the backend service, you will upload the image first and then send the received URL using the `uri` property.
To keep the UI clean, the image message renders in two different ways, if the aspect ratio is too low or too high it renders like a file message, so you don't see a narrow line on the UI. The second way is a classic image in the chat. Go give it a try.
:::tip
You can use this URL https://bit.ly/2P0cn2g to test the file message presentation, remove height and width from the `imageMessage` so the library will calculate it automatically and replace `uri`'s data with this URL.
:::
On tap, images will be previewed inside an interactive image gallery. To disable the image gallery pass `disableImageGallery` property to the `Chat` component. Not available on web and desktop.
## Files
In this example, we will use [react-native-document-picker](https://github.com/rnmods/react-native-document-picker), follow the instructions there to install it. After it is done we can use the file picker to select a file and send it as a message (full example with images and files can be found [here](#putting-it-all-together)):
```ts
// ...
import DocumentPicker from 'react-native-document-picker'
const App = () => {
// ...
const handleFileSelection = async () => {
try {
const response = await DocumentPicker.pickSingle({
type: [DocumentPicker.types.allFiles],
})
const fileMessage: MessageType.File = {
author: user,
createdAt: Date.now(),
id: uuidv4(),
mimeType: response.type ?? undefined,
name: response.name,
size: response.size ?? 0,
type: 'file',
uri: response.uri,
}
addMessage(fileMessage)
} catch {}
}
return (
)
}
export default App
```
Similar to the text message, you will need to create a file message using data from the document picker. In this example, `uri` will point to the local filesystem just for demo purposes, but for the backend service, you will upload the file first and then send the received URL using the `uri` property.
### Opening a file
Right now, nothing will happen when a user taps on a file message, we will need to add another dependency. In this case, let's add [react-native-file-viewer](https://github.com/vinzscam/react-native-file-viewer). As usual, follow the instructions there to install it. Now we can open a file:
```ts
// ...
import FileViewer from 'react-native-file-viewer'
const App = () => {
// ...
const handleMessagePress = async (
message: MessageType.DerivedUserMessage
) => {
if (message.type === 'file') {
try {
await FileViewer.open(message.uri, { showOpenWithDialog: true })
} catch {}
}
}
return (
)
}
export default App
```
## Link preview
Link preview works automatically, we created a separate package for that, you can found it [here](https://github.com/flyerhq/react-native-link-preview). It can be disabled by setting `usePreviewData` to false. Usually, however, you'll want to save the preview data so it stays the same, you can do that using `onPreviewDataFetched` callback:
```ts
// ...
import { PreviewData } from '@flyerhq/react-native-link-preview'
const App = () => {
// ...
const handlePreviewDataFetched = ({
message,
previewData,
}: {
message: MessageType.Text
previewData: PreviewData
}) => {
setMessages(
messages.map((m) =>
m.id === message.id ? { ...m, previewData } : m
)
)
}
return (
)
}
export default App
```
## Putting it all together
Now to choose between images and files from a single button we will use another dependency - [react-native-action-sheet](https://github.com/expo/react-native-action-sheet), please follow the instructions there to install it. If you skipped previous sections and want to use this example, remember to install - [react-native-image-picker](https://github.com/react-native-image-picker/react-native-image-picker), [react-native-document-picker](https://github.com/rnmods/react-native-document-picker) and [react-native-file-viewer](https://github.com/vinzscam/react-native-file-viewer). This is a drop-in example, everything should work if you had installed all the dependencies.
:::important
Don't forget to wrap your app with `ActionSheetProvider` from `@expo/react-native-action-sheet`. Remember that it should be done outside a component provided in this example since we are using the `useActionSheet` hook which can't be used before the component is wrapped in `ActionSheetProvider`. You can create another component called `AppContainer.tsx` and wrap `` in the `ActionSheetProvider` there.
:::
```ts
import { useActionSheet } from '@expo/react-native-action-sheet'
import { Chat, MessageType } from '@flyerhq/react-native-chat-ui'
import { PreviewData } from '@flyerhq/react-native-link-preview'
import React, { useState } from 'react'
import DocumentPicker from 'react-native-document-picker'
import FileViewer from 'react-native-file-viewer'
import { SafeAreaProvider } from 'react-native-safe-area-context'
import { launchImageLibrary } from 'react-native-image-picker'
// For the testing purposes, you should probably use https://github.com/uuidjs/uuid
const uuidv4 = () => {
return 'xxxxxxxx-xxxx-4xxx-yxxx-xxxxxxxxxxxx'.replace(/[xy]/g, (c) => {
const r = Math.floor(Math.random() * 16)
const v = c === 'x' ? r : (r % 4) + 8
return v.toString(16)
})
}
const App = () => {
const { showActionSheetWithOptions } = useActionSheet()
const [messages, setMessages] = useState([])
const user = { id: '06c33e8b-e835-4736-80f4-63f44b66666c' }
const addMessage = (message: MessageType.Any) => {
setMessages([message, ...messages])
}
const handleAttachmentPress = () => {
showActionSheetWithOptions(
{
options: ['Photo', 'File', 'Cancel'],
cancelButtonIndex: 2,
},
(buttonIndex) => {
switch (buttonIndex) {
case 0:
handleImageSelection()
break
case 1:
handleFileSelection()
break
}
}
)
}
const handleFilePress = async (message: MessageType.File) => {
try {
await FileViewer.open(message.uri, { showOpenWithDialog: true })
} catch {}
}
const handleFileSelection = async () => {
try {
const response = await DocumentPicker.pickSingle({
type: [DocumentPicker.types.allFiles],
})
const fileMessage: MessageType.File = {
author: user,
createdAt: Date.now(),
id: uuidv4(),
mimeType: response.type ?? undefined,
name: response.name,
size: response.size ?? 0,
type: 'file',
uri: response.uri,
}
addMessage(fileMessage)
} catch {}
}
const handleImageSelection = () => {
launchImageLibrary(
{
includeBase64: true,
maxWidth: 1440,
mediaType: 'photo',
quality: 0.7,
},
({ assets }) => {
const response = assets?.[0]
if (response?.base64) {
const imageMessage: MessageType.Image = {
author: user,
createdAt: Date.now(),
height: response.height,
id: uuidv4(),
name: response.fileName ?? response.uri?.split('/').pop() ?? '🖼',
size: response.fileSize ?? 0,
type: 'image',
uri: `data:image/*;base64,${response.base64}`,
width: response.width,
}
addMessage(imageMessage)
}
}
)
}
const handlePreviewDataFetched = ({
message,
previewData,
}: {
message: MessageType.Text
previewData: PreviewData
}) => {
setMessages(
messages.map((m) =>
m.id === message.id ? { ...m, previewData } : m
)
)
}
const handleSendPress = (message: MessageType.PartialText) => {
const textMessage: MessageType.Text = {
author: user,
createdAt: Date.now(),
id: uuidv4(),
text: message.text,
type: 'text',
}
addMessage(textMessage)
}
return (
// Remove this provider if already registered elsewhere
// or you have React Navigation set up
)
}
export default App
```
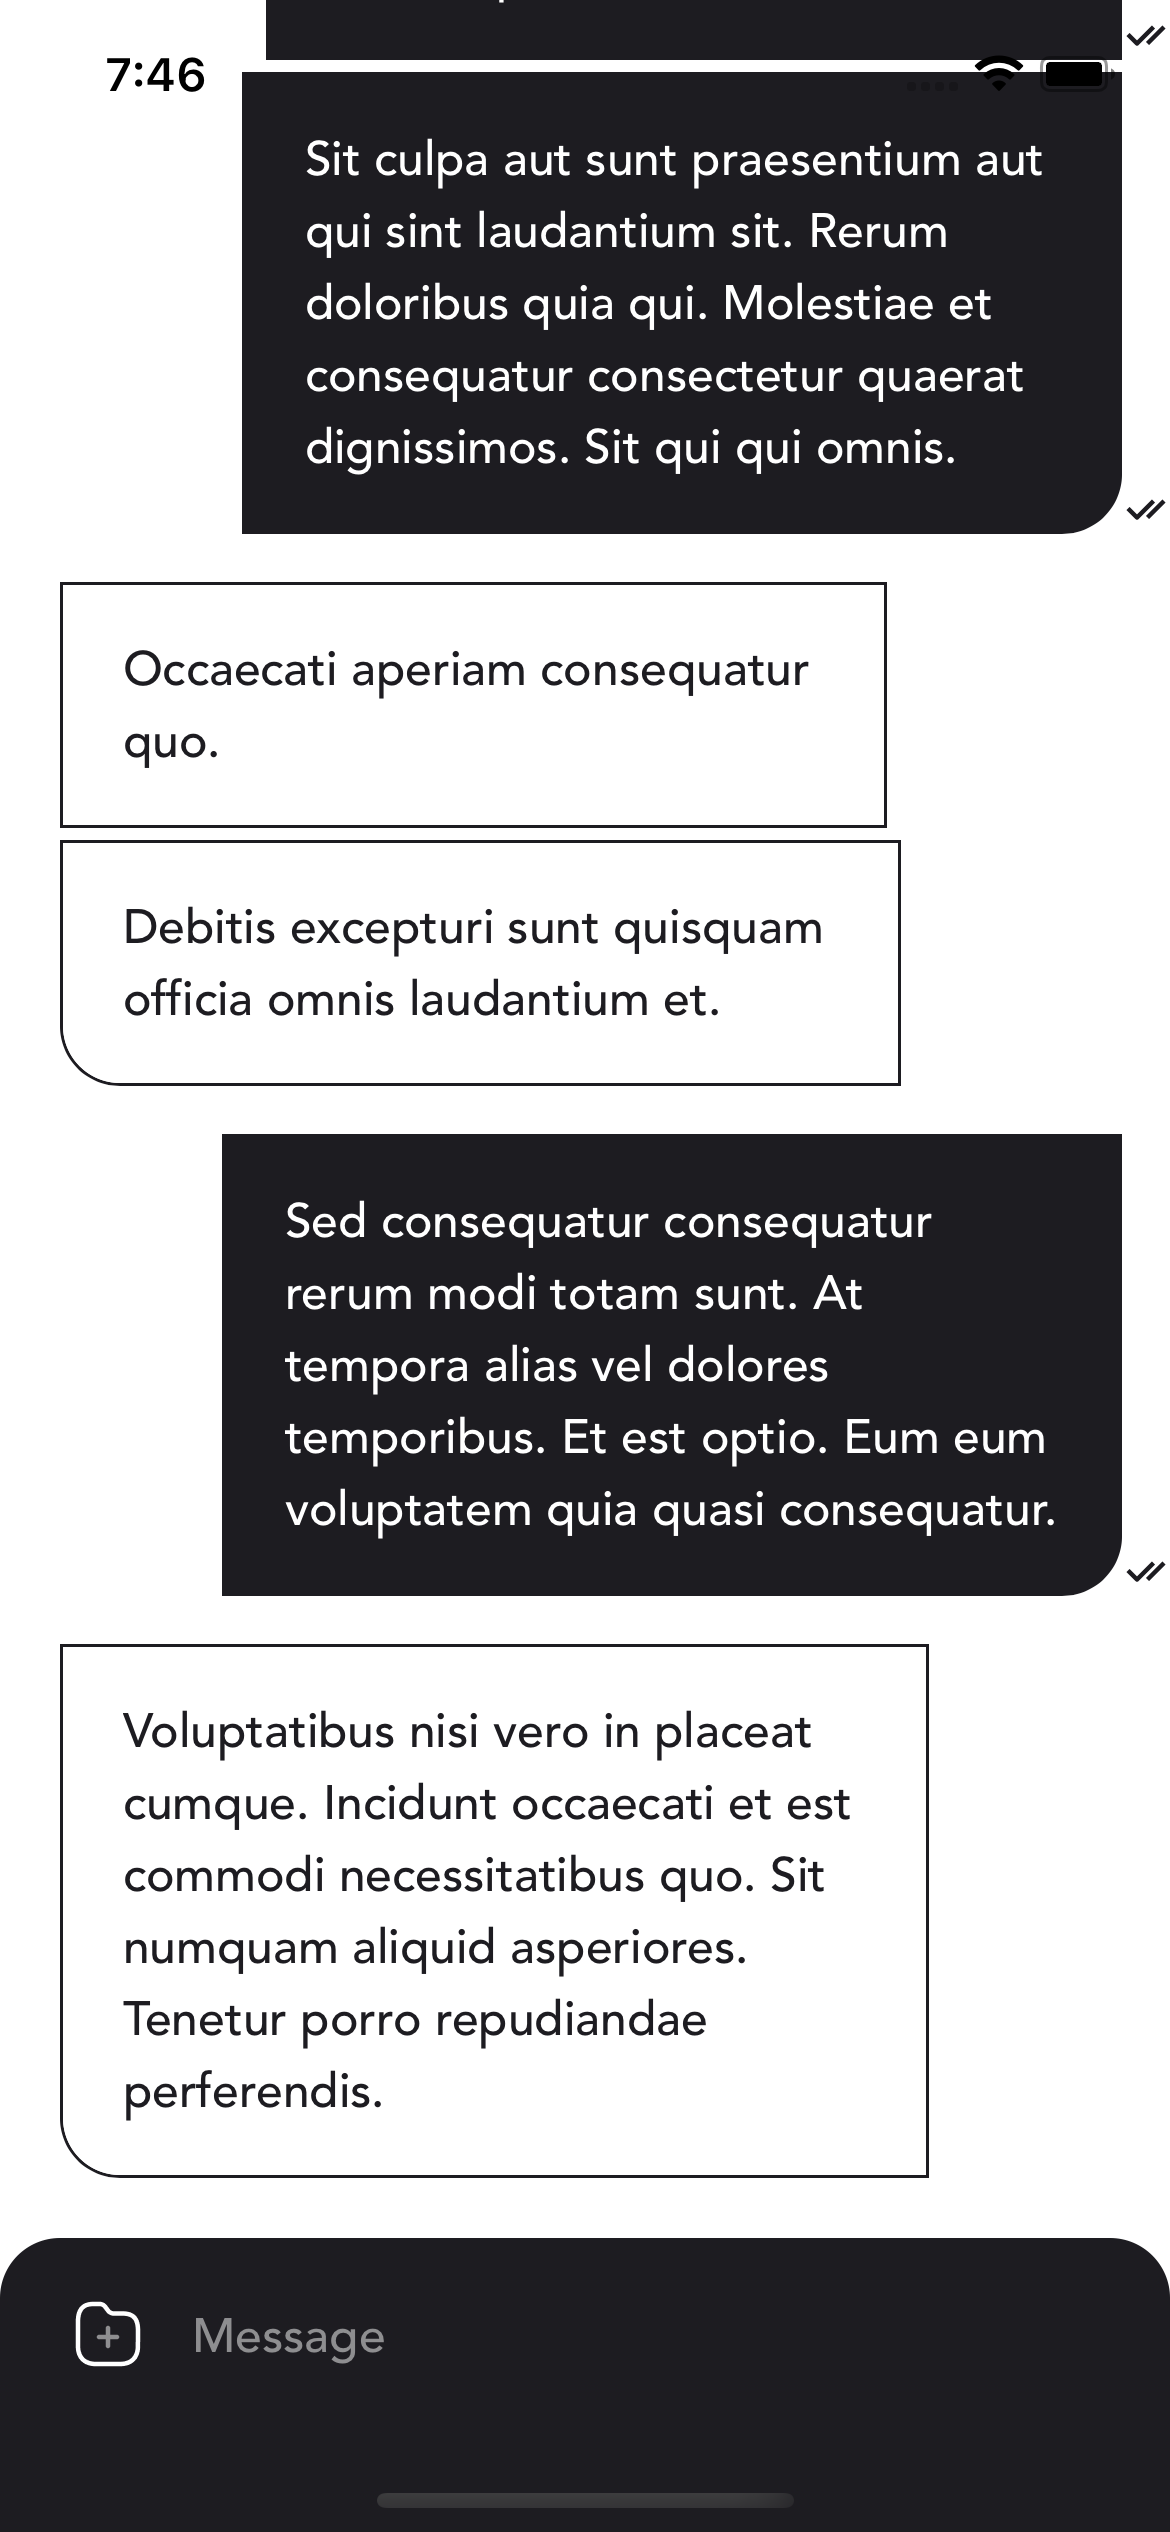
## Custom chat bubbles
Just pass the `renderBubble` function to the `Chat` component. `child` parameter of the `renderBubble` function is a default message content (which you can further customize using `renderCustomMessage`, `renderFileMessage`, `renderImageMessage`, `renderTextMessage` etc.). `message` parameter gives you the actual message to work with, where you can see whether the current user is author, message type, or anything you'd like to customize the bubble. `nextMessageInGroup` parameter gives you a hint about message groups and if you want to add a nip only for the last message in the group, you can do that (messages are grouped when written in quick succession by the same author).
```ts
import { Chat, defaultTheme, MessageType } from '@flyerhq/react-native-chat-ui'
import { ReactNode } from 'react'
import { View } from 'react-native'
const renderBubble = ({
child,
message,
nextMessageInGroup,
}: {
child: ReactNode
message: MessageType.Any
nextMessageInGroup: boolean
}) => {
return (
{child}
)
}
return (
)
```
This is how it would look like
 ## Custom messages
Use the `renderCustomMessage` function to render whatever message you want. To store the data use a `metadata` map of the `CustomMessage`. You can have multiple different custom messages, you will need to identify them based on some property inside the `metadata` and render accordingly.
## Pagination
Use `onEndReached`, `onEndReachedThreshold` (available through `flatListProps`) and `isLastPage` parameters to control pagination. Here is a simple example based on a [basic usage](basic-usage):
```ts
// ...
const App = () => {
const [page, setPage] = useState(0)
// ...
useEffect(() => {
handleEndReached()
}, [])
const handleEndReached = async () => {
const response = await fetch(
`https://api.instantwebtools.net/v1/passenger?page=${page}&size=20`
)
const json = await response.json()
const m = json.data.map((e: any) => ({
author: user,
id: e._id,
text: e.name,
type: 'text',
}))
setMessages([...messages, ...m])
setPage(page + 1)
}
return (
)
}
export default App
```
## User avatars & names
To show user avatars & names use `showUserAvatars` and `showUserNames` parameters. Can be used separately. By default, the chat will select one of 10 provided colors as an avatar background and name text color. Color is calculated based on the user's `id` hash code, so it is unique in different rooms. To modify provided colors use `userAvatarNameColors` parameter in [theme](themes). If you want to have one color for everyone, just pass this color as a single item in the `userAvatarNameColors` list.
## Custom messages
Use the `renderCustomMessage` function to render whatever message you want. To store the data use a `metadata` map of the `CustomMessage`. You can have multiple different custom messages, you will need to identify them based on some property inside the `metadata` and render accordingly.
## Pagination
Use `onEndReached`, `onEndReachedThreshold` (available through `flatListProps`) and `isLastPage` parameters to control pagination. Here is a simple example based on a [basic usage](basic-usage):
```ts
// ...
const App = () => {
const [page, setPage] = useState(0)
// ...
useEffect(() => {
handleEndReached()
}, [])
const handleEndReached = async () => {
const response = await fetch(
`https://api.instantwebtools.net/v1/passenger?page=${page}&size=20`
)
const json = await response.json()
const m = json.data.map((e: any) => ({
author: user,
id: e._id,
text: e.name,
type: 'text',
}))
setMessages([...messages, ...m])
setPage(page + 1)
}
return (
)
}
export default App
```
## User avatars & names
To show user avatars & names use `showUserAvatars` and `showUserNames` parameters. Can be used separately. By default, the chat will select one of 10 provided colors as an avatar background and name text color. Color is calculated based on the user's `id` hash code, so it is unique in different rooms. To modify provided colors use `userAvatarNameColors` parameter in [theme](themes). If you want to have one color for everyone, just pass this color as a single item in the `userAvatarNameColors` list.